Showing posts with label Perfect Polka Dots. Show all posts

Saturday, March 29, 2014

6 x 6" One Sheet Wonder set of cards and gift box

Hi there Stampers! Yes I know its been a long time between posts. Family illness put a whole lot of things on the back burner until the end of last month. a I havent been idle all the time, although all of December and most of January most of my time was spent at a hospital but now hopefully we are again on the upward scale and back to whatever normal is. The project I am showing here, was initially scheduled for December, but held it last month finally and is for a One Sheet Wonder using just a 6 x 6" piece of DSP. The cutting of the DSP is not my template, and I found it on Pinterest . There are lots to be found and this one come from Verves Stamps and what a wonderful way to use up some of those smaller squares of DSP!
 Firstly, we made the box to hold the cards and the envelopes in, and for the box we used the Envelope Punch Board, I love that tool makes it so very easy to whip up a box or indeed any size envelope you might need! The flap at the back was kept in place by punching out a Modern Label Punch and securing it on either side with a mini silver brad. The cards them selves were so easy and quick to do, and the ladies were amazed at how lovely they were, and all by using small pieces of DSP. We used Perfect Polka Dots and also the Modern Mosaic Embossing Folders, to add a bit of interest. We used The Reason to Smile Clear Stamp Set for all the flowers. I was so happy to be able to get back into sharing what I love and also to show my lovely ladies how to make this delightful set.
 I will hopefully pop in and out more regularly now and show you what I have been doing in my 'spare' time. If you would like the instructions on how to make this beautiful box and the cards, just send me an email and I will email the instructions  to you.
Thank you for taking the time to read my post and I look  forward to posting more regularly from now. Till next time, happy Stampin'

Sunday, August 4, 2013

Sunny Challenges 85/13


Hi there Stampers!
This week at sunny Challenges and Creations it was Kris's turn to issue the challenge to us all, and what a great sketch has been provided for us to work with.
For my card I used Soft Suede, So Saffron and Whisper White. I used the bird from the Hostess Stamp Set Simply Sketched, and stamped it onto the card base using Soft Suede Classic Stampin Pad. A small Paper Doiley was cut in half and the So Saffron cardstock I ran through the Big Shot with the Perfect Polka Dots embossing Folder. I wrapped a length of White Taffeta ribbon around the So Saffron and attached this to the card front. 2 1/2" Scallop Punch was used to cut out a Soft Suede backing for my 1 3/4" Circle Punch to cut out my Water Colour Paper after I had coloured the bird. The Bird I stamped using Stazon Ink, then using a combination of Stamp n Write Markers and my Aqua Painter I coloured the the bird using Crumb Cake for the body of the bird, Daffodil Delight for the area around his eyes and Old Olive for the grasses. Bermuda Bay was the colour I used for the background, and this was painted on using the Aqua Painter and picking up the ink from the lid of the Bermuda Blue Classic Stampin Pad. The Sentiment is stamped in Soft Suede on Whisper White and punched out with the Large Oval Punch, another ovals was punched out this time in the Soft Suede and it was just offset at the top of the Whisper White. The sentiment and the Scallop Circle were placed on Dimensionals before attaching to the card front.
Kris, Vicky and I would love to have you join us for at Sunny Challenges and Creations.  Remember each one runs for two weeks so you have plenty of time to take part. Who knows you might just be our next winner and Ray of Sunshine! Till next time, take care and happy stamping.

Sunday, April 15, 2012

Sunny Challenges Week 36

Hi there stampers! Here we are with another challenge for Sunny Challenges and Creations. I am back and this week it was my turn to supply the sketch. Being my first week back after a lengthy absence I thought I would make it nice and easy for you. Just follow the sketch! You are free to do whatever you wish with it. I apologise for the quality of the sketch pic but when the photo was taken I was having all sorts of trouble with my camera, and being very unco when it comes to technical stuff I did the best I could at the time. I love Poppy Parade and I really hope it is not one of the colours to go this year, I matted the Whisper White Card stock onto Basic Black after I had run the two smaller pieces through the Big Shot using the Perfect Polka Dots embossing folder. The stamp set I used was Field Flowers, and The Frame was from the Designer Frames embossing set, I cut around the frame after embossing it and put it up on dimensionals  to make it pop. The little heart was punched from the Owl punch. This card looks beautiful in so many colours and  I know you will have a lot of fun doing this sketch. Please come and play with us this week, its a lot of fun and you could be our next Ray of Sunshine!!

Sunday, November 20, 2011

SC 017/11

 
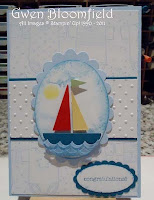
Hello everyone, It was my turn to do the sketch this week for the Sunny Challenges and Creations Challenge, and then I added the 'Nursery' Theme to make it just a little more interesting. Don forget to go along to Kris and Vicky's blogs and check out their wonderful creations! I also wanted to do minimal stamping in this challenge. I started with a Bashful Blue Base and topped that with Whisper White. I rolled the Baby Tees Jumbo wheel useing the Bashful Blue once again, then to add a little bit  of contrast I placed a small strip of Island Indigo acros the centre and topped that with A scrap of Whisper White that I had in my another day box. The Large Scallop Oval and the Large Oval were also out that box. The base of the boat is a Large Oval that has been cut in half, the waves are the trimmings from the Scallop Border Punch and the sails of the boat are Real Red and So Saffron and the flag on top is Pear Pizazz were all punched out using the Petite Pennants  Builder punch!  I sponged around the edges and made my clouds using Marina Mist and the sun could be no other colour than Daffodil Delight!The sentiment is stamped using Island Indigo and placed on cardstock of the same colour that had been punched out using the Scallop Oval. I think this card is pretty cute and it was so easy to put together. I do hope that you will play along with us this week and who knows you could be our very next Ray of Sunshine!! Till next time bye for now

Sunday, October 9, 2011

Season of Joy at Sunny Challenges and Creations

This week the challenge  at Sunny Challenges and Creationswas set by our wonderfully talented Kris. Along with the sketch the stamp set we had to use was Season of Joy. We would love it if you would play along with us this week and enter our challenge. While you are checking out Kris and Vicky's  blogs you can see all the other wonderful creations they have there. I am so lucky to have both these ladies as my mentor! Back to the challenge .....my card started with a base of Very Vanilla, and I used a piece of the Letters to Santa DSP on the bottom section of the card. The top section I placed a piece of Cherry Cobbler. Using the Season of Joy set I stamped the flourish onto Old Olive cardstock using ink of the same colour. I then ran it through the Big Shot using the Perfect Polka Dots embossing folder. That was matted onto Very Vanilla card stock. The lower panel was again mounted onto the Very Vanilla but this time I used Cherry Cobbler as the top mat. I stamped the Christmas tree in Old Olive and cut it out, then used my Cherry Cobbler Stamp and Write Marker to outline the decorations on the tree. I adhered this directly to the mat, but used dimensionals to place it on the card front.  The greeting on the front of the card is also from Season of Joy and it was stamped in Old Olive once again. It was then punched out using the Modern Label Punch and adhered to another shape the same that I had cut using the Big Shot and the Movers and Shapers die  from the set Punch Windows.I also used a piece of the crochet lace across the top of the card which was also a part of the challenge. The inside of the card I used Very Vanilla cardstock and placed a strip of the Letters to Santa DSP along the bottom that I had punched using the Scallop Border Trim Punch. The poinsettia's were stamped in Cherry Cobbler, cut out and just placed on the angle. The sentiment is from the set Heard from the Heart and that was punched in Old Olive.

Sunday, August 21, 2011

Brand New Challenge from Sunny Challenges and Creations

 Here we are into week 4 of  Sunny Challenges and Creations.  Kris Vicky and I hope you will play along with us this week. The challenge this week is to create a card using the sketch on the left, but you  must  use  at least one embossing folder, and the theme is Christmas. You can use any or even no stamp set, as long as the finished creation is of a Christmas theme. That gives everyone a really wide scope, to put forward some beautiful entries. For my card I used Real Red cardstock, which I ran through the Big Shot using the Framed Tulips embossing folder. I then cut panels from the Holly Jolly Designer Paper and topped that with some Whisper White that was also run through the Big Shot using the Perfect Polka Dots embossing folder. I had a scrap of Real Red cardstock on my desk and had punched out the Lace Border, so I put it on top of the Whisper White (which I know has covered the polka dots) and I really like the look of it. The stamp set I used was Contemp Christmas. The sentiment was stamped in Real Red and the tree was stamped onto a  white medium oval in Old Olive.I matted this onto an Old Olive small scallop oval (not SU). I think you will have a lot of fun playing with the sketch this week, so dont forget to go to Sunny Challenges and enter your creations. I really like how my card turned out and I would love to hear what you think too. Bye for now

Wednesday, April 27, 2011

Triple Twisted Easel

Yesterday I showed a Double Twisted Easel Card that I made, and then thought if I can do a double, then why not a triple! It was a lot of fun once I worked it out, and once again I used a little tutorial from Sharon Field that showed a really quick and easy way to do a double bow. There are so many possibilities for this card and the way it can be presented, in regards to the way the easels face, twisted or not, a bit of both the choice is yours! I chose to do a twisted easel each end and a 'regular' easel in the centre. For this card I used Pink Pirourette cardstock and placed a peice of Pink Pirourette Designer Paper upon the base. The Pretty in Pink panels I ran through the Big Shot using the Perfect Polka Dots embossing folder and attached them to the easel. The centre panel I used a piece of Presto Designer Speciality Paper and sponged it over with a mixture of Pink Pirourette Re inker and Frost White Shimmer Ink. I then ran it through the Big Shot Using the Scallop Oval Die, and then ran some Pretty in Pink through as well but this time using the Ovals Die. The sentiment I stamped onto a piece of Very Vanilla in Regal Rose and lightly run the edge around the Regal Rose Stamp pad. To assemble this I just mounted them one on top of the other using the Snail adhesive. I also used Snail Adhesive to mount it on the Pretty in Pink base.
The Double Bow was so easy and it looks lovely. I used the1/2" Chantilly Lace. It is the first time I had used it and I am so glad I did, it lent the card some delicate trim. The first panel I once again used the Scallop Oval Die, the Oval Die and the Large Oval Punch and matted them as shown. Using the Scallop circle punch I punched out three in Concord Crush, Rose Red and So Safron, and made three roses, which I had learned to do at a class held by Kris McIntosh some little while ago. I used Certainly Celery and the Little Leaves embosslit for the leaves and placed them on the diagonal. The flowers were attached using Crystal effects, and the Scallop Oval was attached using dimensionals. I placed strips of pearls to act as the stopper for the easels so that they would stand up. Now I am going to have to come up with a envobox to put it in! :))
I hope you like this card and keep an eye out there is another to come tomorrow
Bye for now,,,,,,,

Monday, April 4, 2011

Super Cute Post It Note Holder

Today I looked at The Three Sisters site and under the members freebies I found the template for this adorable post it not holder. I decided to use the flowers from the Punch Bunch Level 1 Hostess set and stamp in versamark all over the cardstock. The rest of the post it note holder is made from bits out of my 'another day' box. I had a scrap of Soft Suede that had been put through the Big Shot with the Perfect Polka Dots embossing folder that I attached and cut around to shape. I also had a scrap of Very Vanilla that had been cut using the Tasteful Trim Die and I layered that across the Soft Suede. At long last I found a home for the scrap of So Safron Striped ribbon that had been living in my another day box for so long still with the buckle attached from my Hodge Podge kit. The owl I stamped is from the sal-a-bration set and I put him on dimensionals after punching him out using the XL Owl Punch, and gave him two mischevious rhinestones in his eyes. I punched a wide oval from So Safron and attached that to the front of the flap. to hold the lid closed I placed a velcro dot. I really love how this holder turned out, and would love to know what you think! Bye for now

Friday, April 1, 2011

Motorcycle Card Share

 
Hi everyone, Today's card share is another of the cards the ladies made at our last class and it went in the Mini Magazine Folder. I wanted to not have the top of the card 'blank' but did not want to have any stamped images either. To get the look that I achieved in this card I did the following. I placed my piece of Sahara Sand Cardstock to the size I wanted and run it through the Big Shot using the Perfect Polka Dots embossing folder. I then put the same piece of cardstock into the Tulip frame embossing folder and ran it through the Big Shot once again. The result is that you still have the slight impression of the polka dots and the firm impression of the Tulip frame. It looks very effective and it just added that little bit of WOW to the finished card. On the lower section of the card I used the Elegant Soiree designer paper and topped it with a strip of Marina Mist cardstock and placed a decorative band from the Tasteful Trim Die across it. The image I stamped on Very Vanilla using Soft Suede ink, then mounted that on Marina Mist then Soft Sued Cardstock and placed it all on dimensionals. I am having so much fun playing with with the Big Shot to see what I can do with the embossing folders and I thought that I would share it with you too. Please let me know what you think, I would love to hear! Bye for now,

Friday, February 25, 2011

Wild Wasabi, So Safron and Perfect Plum


Whilst I was talking to my good friend Kris yesterday,we were discussing my self challenges that I have been doing. So whilst talking to her I did the close the eyes trick and came up with the above colours. The random selection of stamp set was Loads of Love. So I set to work and put the Perfect Plum through the Big Shot using the Perfect Polka Dots embossing folder. I love the way we can emboss our card fronts in this way and there are no gaps of where the embossing folder finishes. Stamped the truck and the flowers from the Load of Love stamp set onto water colour paper with Stazon, coloured it using the watercolour pencils and the aqua painter (how I love my aqua painter). I stamped the trees from this same set in So safron onto the So Safron cardstock, attached this to the Wild Wasabi and in turn to the Perfect Plum Base. I attached dimensionals onto the truck to make it pop and then attached so So Safron Ribbon that I had to finish it off. I quite like this one too. Let me know what you think! Bye for now. Gwen

Sunday, October 3, 2010

I love it when there is rubbish on televison!

 
The reason I love it when there is rubbish on television of an evening is that it gives me the perfect excuse to sit at my table and play! I expect if I was really very truthful............I dont need an excuse at all!!!
Before I cleaned up my table yet again I thought I should have a little more creative time which was definitely better than watching the DVD Concerned Citizen.
I can sit there in my own little world and do as I wish, but also be able to pick up a phrase here and there or glance up and see a fleeting
moment of a scene, and when my husband talks to me about the movie I am at least able to make some 'intelligable" comment! Whew!!!
This time I thought that I would play with Dasher, Snow Swirled, Season of Joy and some more of my another day stash, as well as other stamps and I couldnt resist having a play with the set Baby Bundle. It is just so so cute.
My another day stash must sound as if it is huge! It isnt really, but when I get new embossing folders, or dies I just cant wait to try them out, and as a result I have a heap of Whisper white cut 10.5 vx 14.98 and the same in usually retired card stock, and when the pieces are embossed or cut they go into ther another day box. It does come in handy when you're in a hurry to make a card when you have all these embossed pieces of cardstock etc. I also did some cards using the Thoughts and Prayers stamp set, but becasuse I am such a terrible photograher they didnt turn out, which was disappointing because I really loved the combination that aI used. I used So Safron for the card, Always Artichoke (embossed using Petals a Plenty), stamped the flowers from Thoughts and Prayers onto a piece of Certain Celery, which was matted on So Safron. I then stamped the image twice, once in Always Artichoke and then in White Craft. The sentiment I stamped straight onto the So Safron card base. It really does look striking and I must try to take some more pics. When I had done that card I was so taken by it, I grabbed some scrap from my another day box and stamped some trees and flowers from this set using the same technique but in various colours. Those images have gone back into the box for re-use. I did make one other, but as yet I havent photographed it.
I have fallen in love with the Baby Bundle stamp set, it is so cute. One of my ladies rang the other night and said could I please make her a baby card, as her daughter had just given birth to a little boy, and this is what I came up with. I used Bashful Blue Cardstock, Perfect Polka Dots embossing folder, andthe Word Window Punch and the Modern Label Punch. The little duck is not SU.
I finished it all off with just a dash of Dazzling Diamonds in the heart, coloured the dots on the stroller and wheels with Baja Breeze Stamp and Write Marker pen, and used the black Marker pen to do the dashes in the pram hood. Because the Baby bundle set is in Clear Mount, I took all the small images and put them onto one of the clear stamp blocks and stamped all over the Whisper White to give the card a ;real; nursery feel to it. My lady was thrilled with the result, and I sort of got the picture right. I have made some other cards (or they re in the process of being made) and I will share them over the next couple of days as they are completed. So till next time, keep stampin'


Related Posts Plugin for WordPress, Blogger...